This documentation will be working as a simple guidance to make a full consensus for collaboration on further projects by KYP-Labs. All contents aim to simply deliver ‘how-to’ rather than ‘why’, which is sufficiently well-described in the referenced pages. Later on, new topics will possibly be added on the fly if needed.
Contents
Git commit message
Carefully written commit messages help contributors gain a better sense of the overall history and even great intuition for the changes. In order to create a useful revision history, teams should comply with a commit message convention that defines the following seven rules [1]:
- Separate subject from body with a blank line: Sometimes a single line is fine when it comes to a very simple change that people can fully understand without difficulties.
- Limit the subject line to 50 characters: Proper length of title ensures that it is readable. GitHub’s UI is fully aware of these conventions, so it will warn you if you go over the 50 character limit; any subject line longer than 72 characters will be truncated.
- Capitalize the subject line and body lines
- Do not end the subject line with a period
- Use the imperative mood: Git itself uses the imperative whenever it creates a commit on your behalf, so using the imperative can make a consistent tone.
- Wrap the body at 72 characters: The reason for wrapping your description lines at the 72nd mark is that git log adds a padding of 4 blank spaces when displaying the commit message[2]. As a lot of people use terminals 80 characters wide, and commit messages are often shown with 4 spaces indentation (add another 4 for the same margin on the right side), 72 is an ideal length[3].
- Use the body to explain what and why vs. how: In most cases, you can leave out details about how a change has been made. Code is generally self-explanatory in this regard (and if the code is so complex that it needs to be explained in prose, that’s what source comments are for).
For example:
Summarize changes in around 50 characters or less

More detailed explanatory text, if necessary. Wrap it to about 72
characters or so. In some contexts, the first line is treated as the
subject of the commit and the rest of the text as the body. The
blank line separating the summary from the body is critical (unless
you omit the body entirely); various tools like `log`, `shortlog`
and `rebase` can get confused if you run the two together.

Explain the problem that this commit is solving. Focus on why you
are making this change as opposed to how (the code explains that).
Are there side effects or other unintuitive consequences of this
change? Here's the place to explain them.

Further paragraphs come after blank lines.

 - Bullet points are okay, too

 - Typically a hyphen or asterisk is used for the bullet, preceded
   by a single space, with blank lines in between, but conventions
   vary here

If you use an issue tracker, put references to them at the bottom,
like this:

Resolves: #123
See also: #456, #789
Tip. Add this line to your ~/.vimrc to add spell checking and automatic wrapping at the recommended 72 columns to you commit messages[4].
autocmd Filetype gitcommit setlocal spell textwidth=72
Note that the default gitcommit.vim syntax file already stops highlighting the first line after 50 characters[5].
Git Branching strategy
You can keep your branch strategy simple by building it from these three concepts [6]:
- Use feature branches for all new features and bug fixes.
- Merge feature branches into the master branch using pull requests.
- Keep a high quality, up-to-date master branch.
A strategy that extends these concepts and avoids contradictions will result in a version control workflow for your team that is consistent and easy to follow.
Simple workflow

Develop your features and fix bugs in feature branches (also known as topic branches) based off your master branch. Feature branches isolate work in progress from the completed work in the master branch. Git branches are inexpensive to create and maintain, so even small fixes and changes should have their own feature branch. One thing to note is that you should create another feature branch, which is called user or personal branch, if you are not working alone on the feature branch. In that case, the user branch will be merged into the feature branch via pull request.
Name your feature branches by convention
Use a consistent naming convention for your feature branches to identify the work done in the branch. You can also include other information in the branch name, such as who created the branch.
Some suggestions for naming your feature branches:
feat/feature-namefeat/feature-area/feature-nameusr/username/descriptionusr/username/workitembugfix/descriptionhotfix/description
Squash and merge your pull request commits
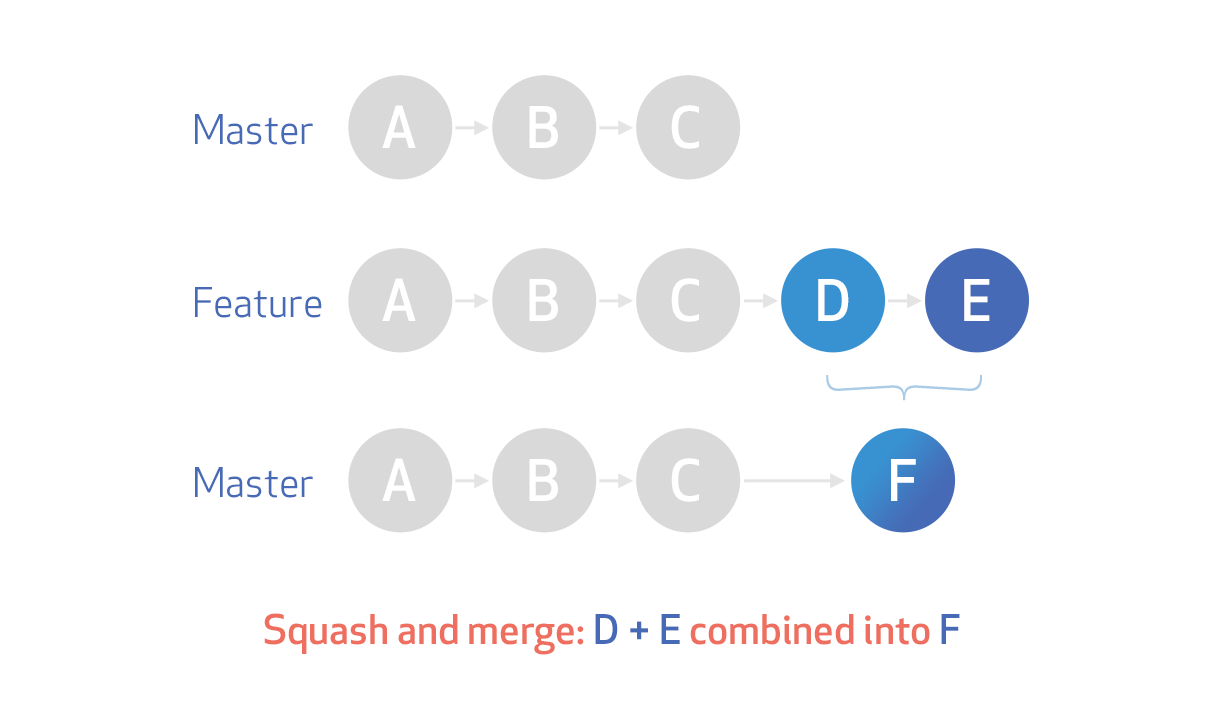
Commit squashing has the benefit of keeping your git history tidy and easier to digest than the alternative created by merge commits. While merge commits retain commits like “oops missed a spot” and “maybe fix that test? [round 2]”, squashing retains the changes but omits the individual commits from history. Many people prefer this workflow because, while those work-in-progress commits are helpful when working on a feature branch, they are not necessarily important to retain when looking at the history of your base branch Here’s what squashing on merge looks like[7]:
Here is an example of squash merging from a feature branch to a master branch:
Step1. Make sure your local master branch up to date
git checkout master
git pull origin master
Step2. Create a local feature branch
git checkout -b features/test-squash-merging
or
git branch features/test-squash-merging
git checkout features/test-squash-merging
Step3. Create a remote feature branch
git push origin features/test-squash-merging
Step4. Work on the feature branch and commit changes
...
git add changes
git commit -m "Test squash merging"
Step5. Merge the changes into the remote feature branch
git push origin features/test-squash-merging
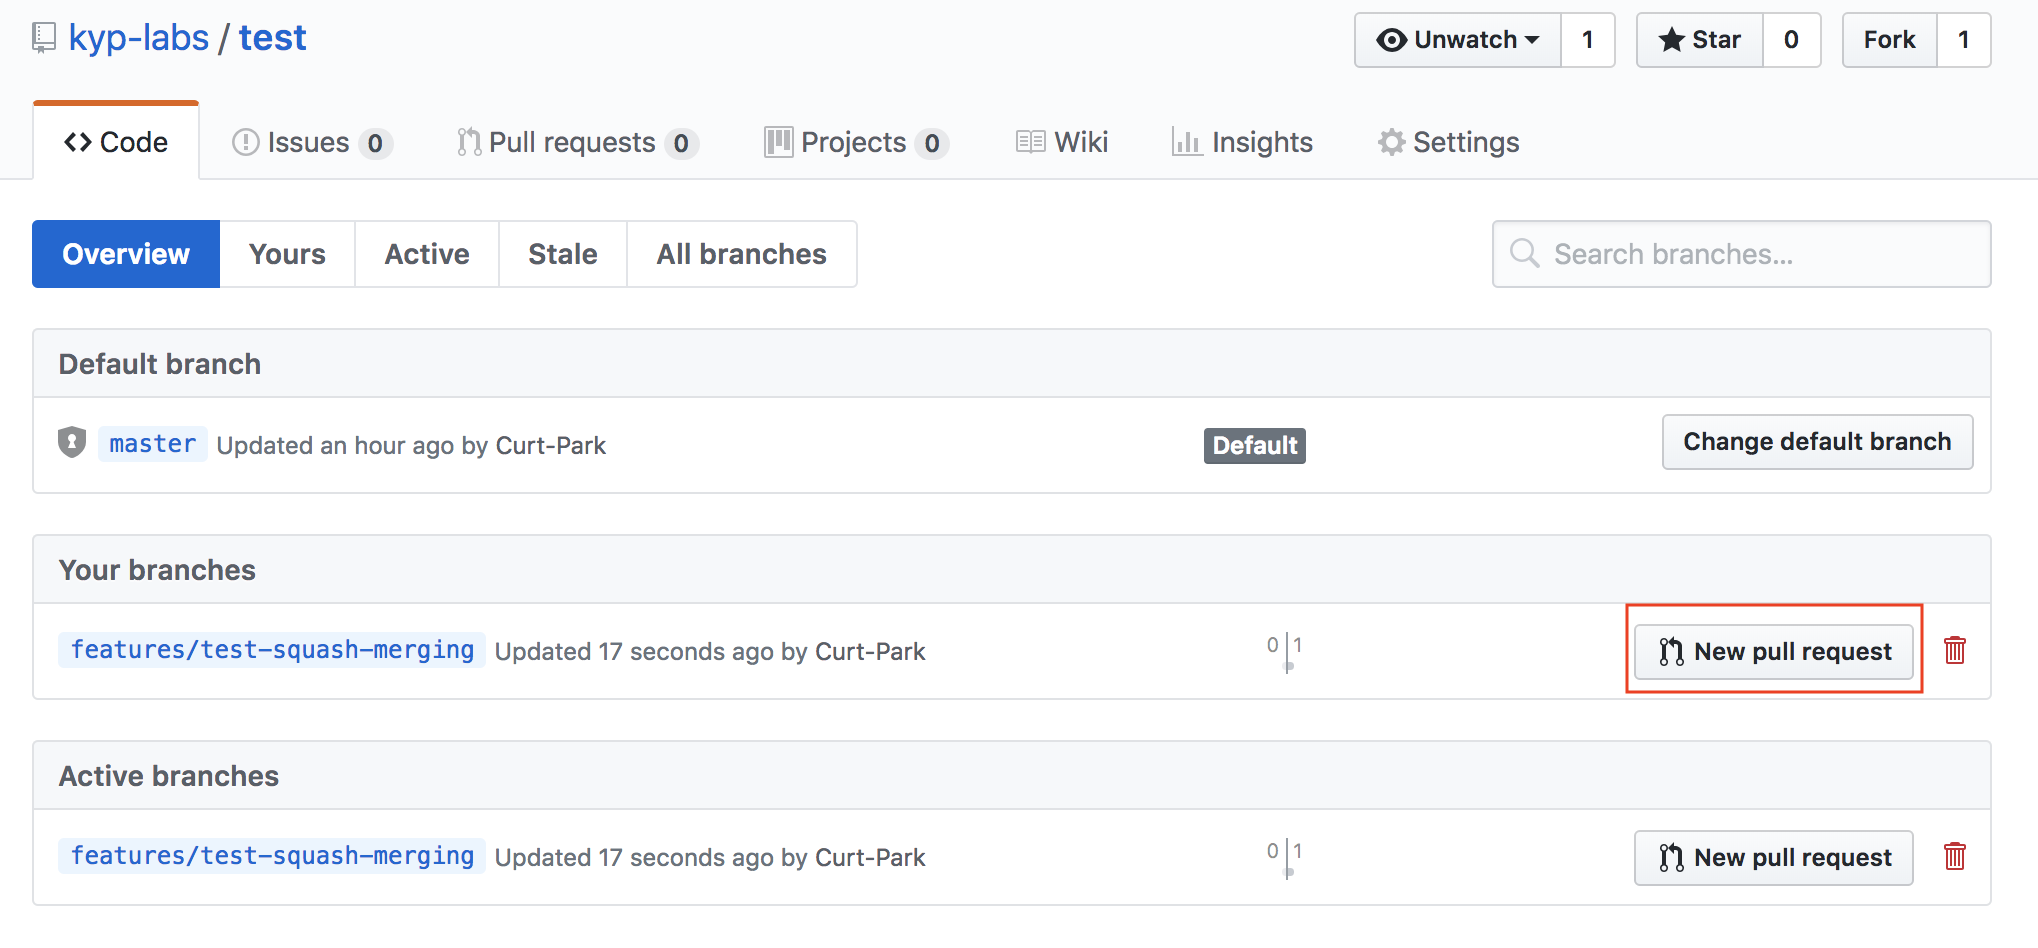
Step6. Click the ‘branches’ tab on the repository webpage and make a new pull request
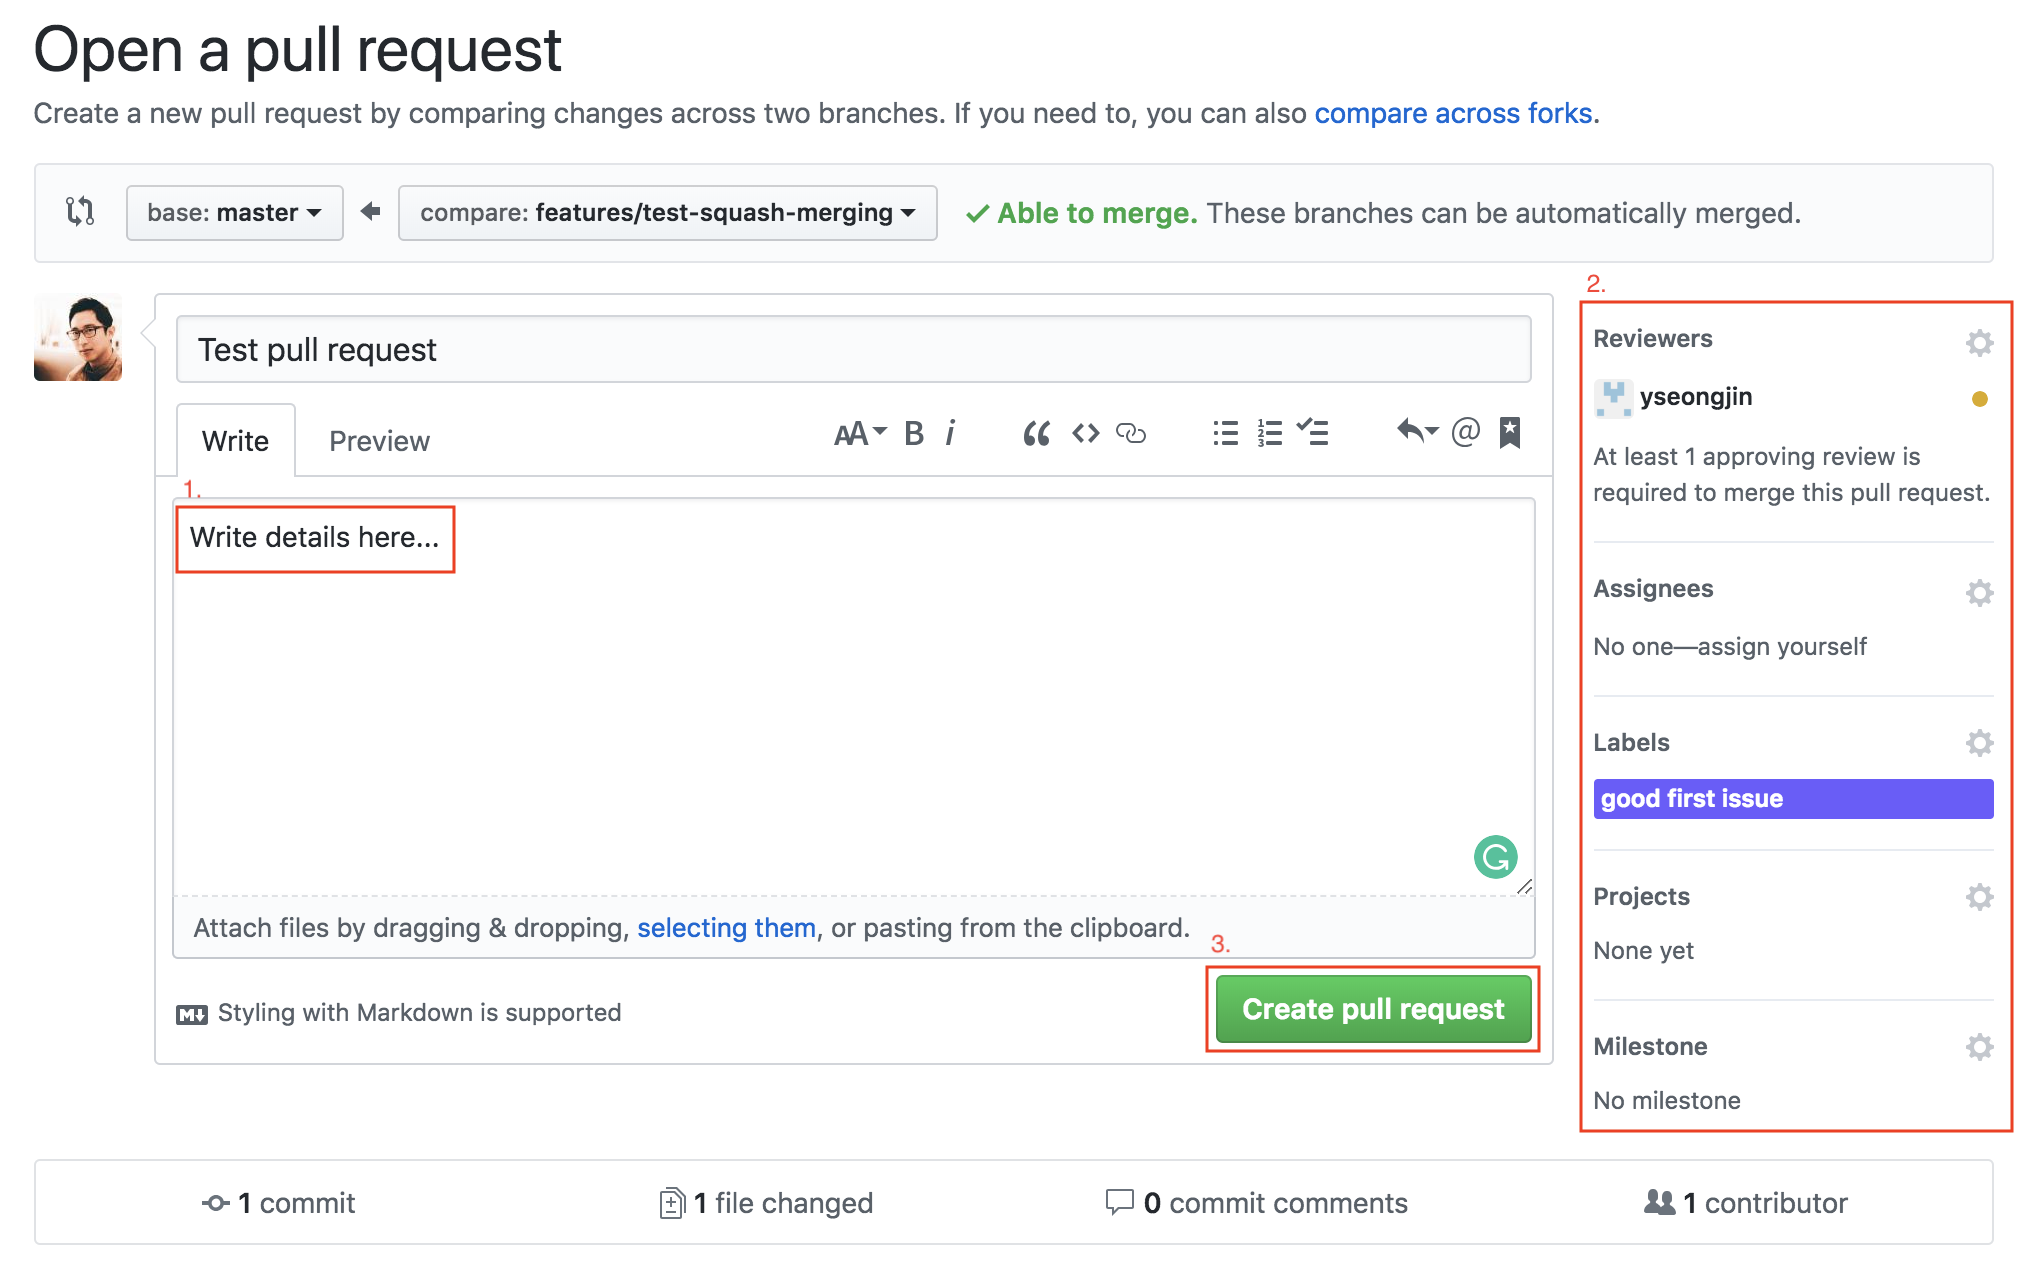
Step7. Fill out some details for the pull request
- Write a detailed description about the pull request focusing on what and why
- Set reviewers, labels, and so on
- Create pull request
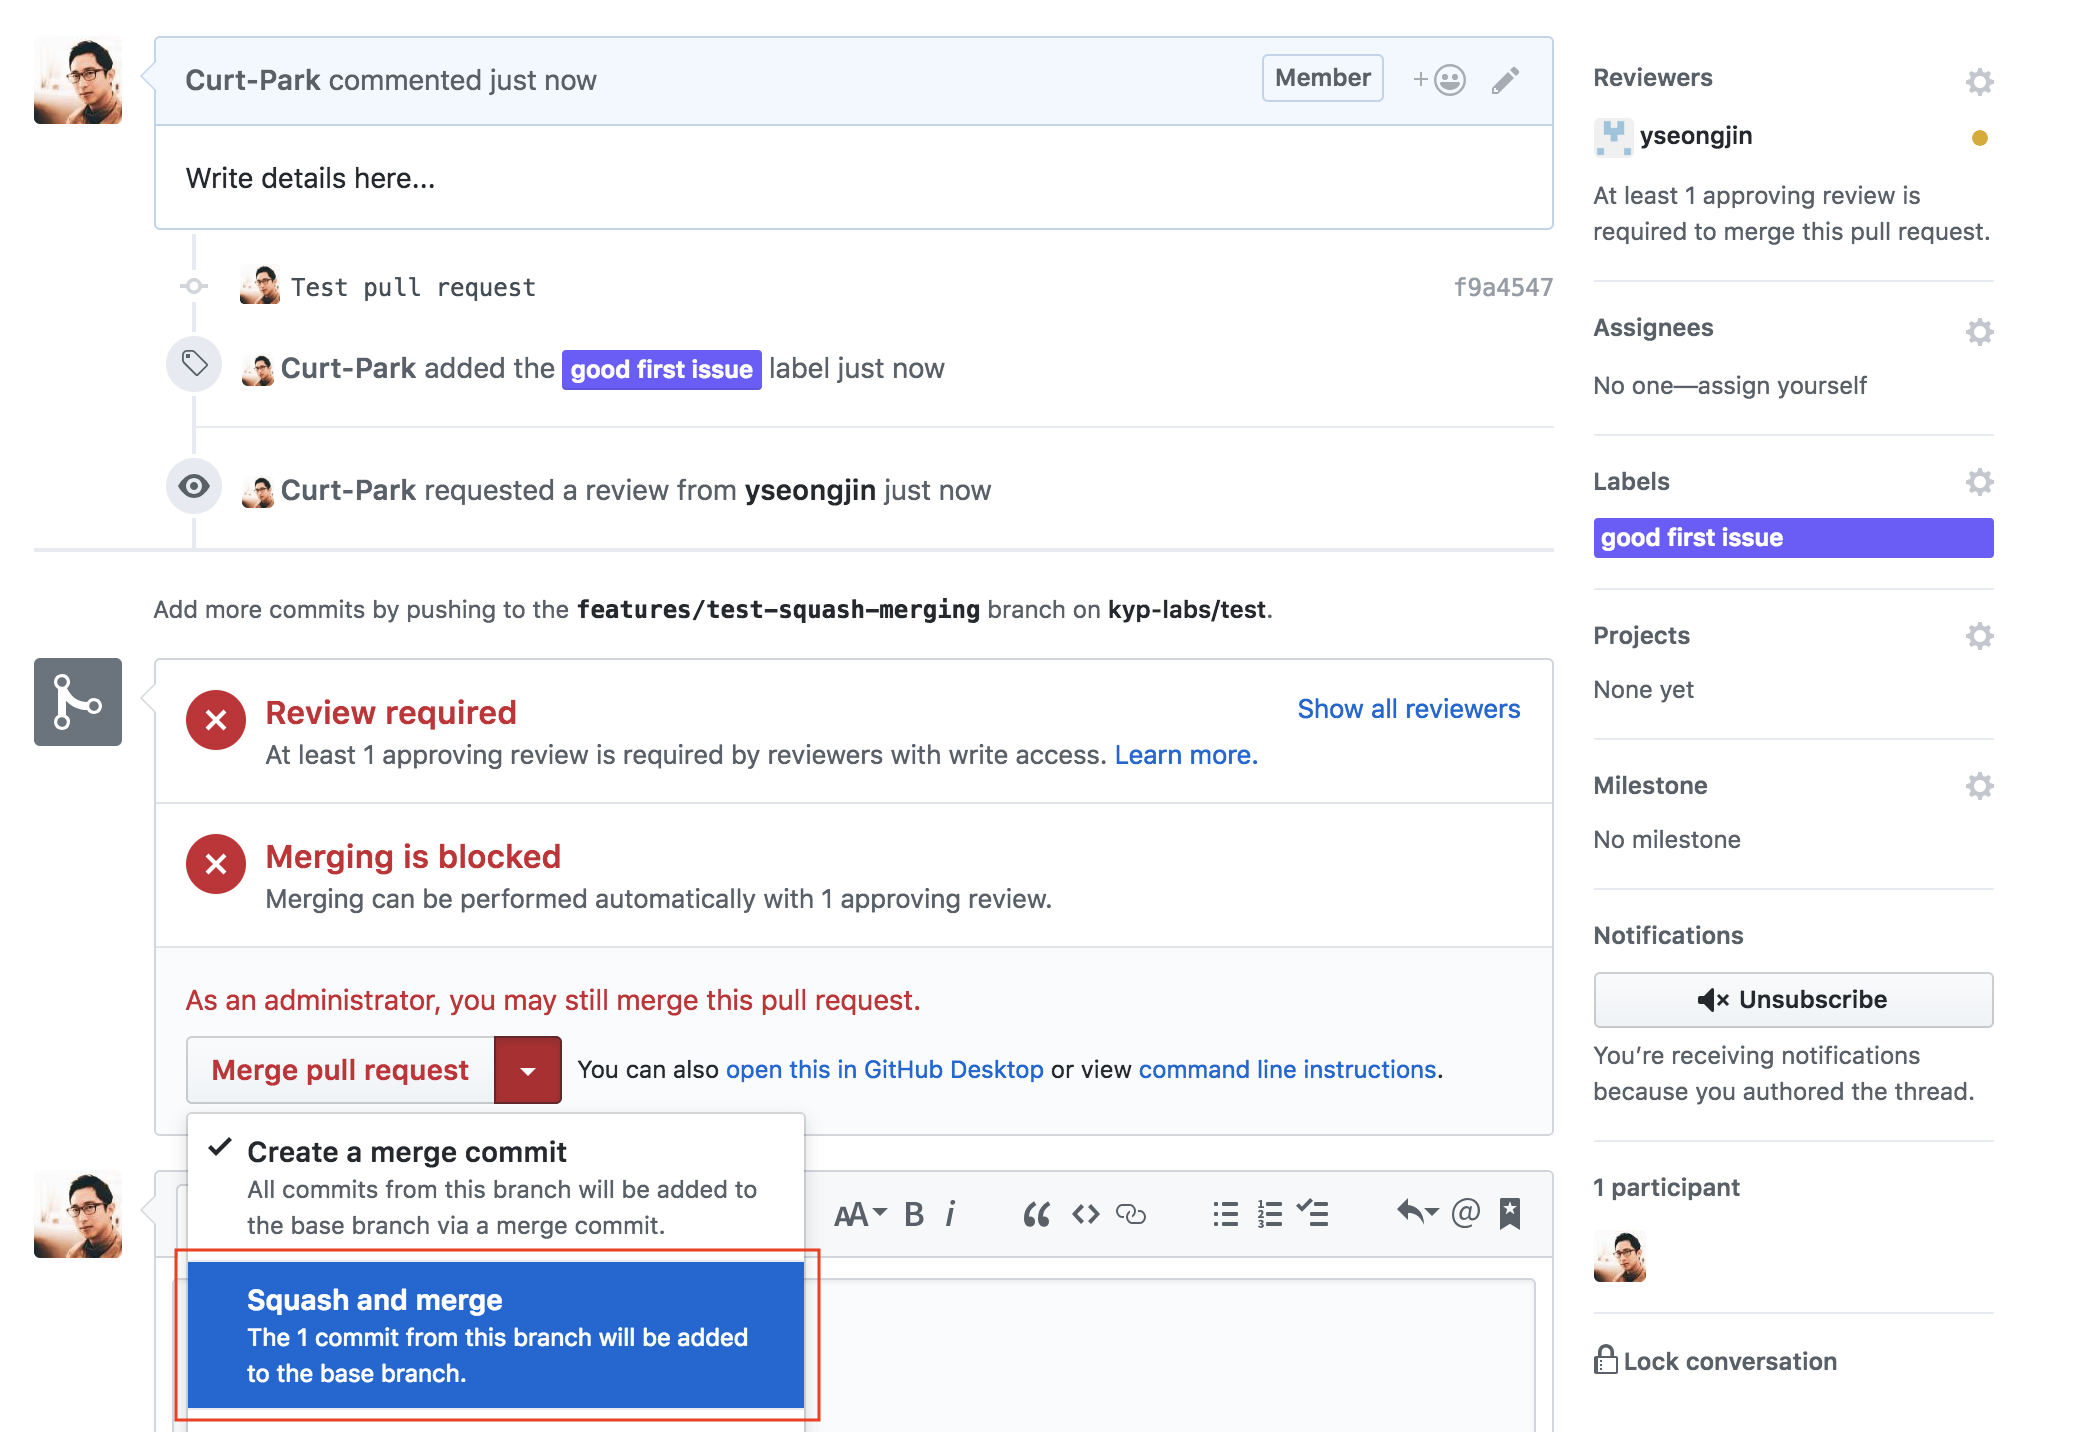
Step8. Check squash and merge
Step9. Click ‘Squash and merge’ button after all requirements are satisfied
Step10. Check the pull request is successfully done
Tip. If you don’t want to allow non-squash commits merged, deactivate the following checkbox in ‘Settings’.
Important settings for remote branches
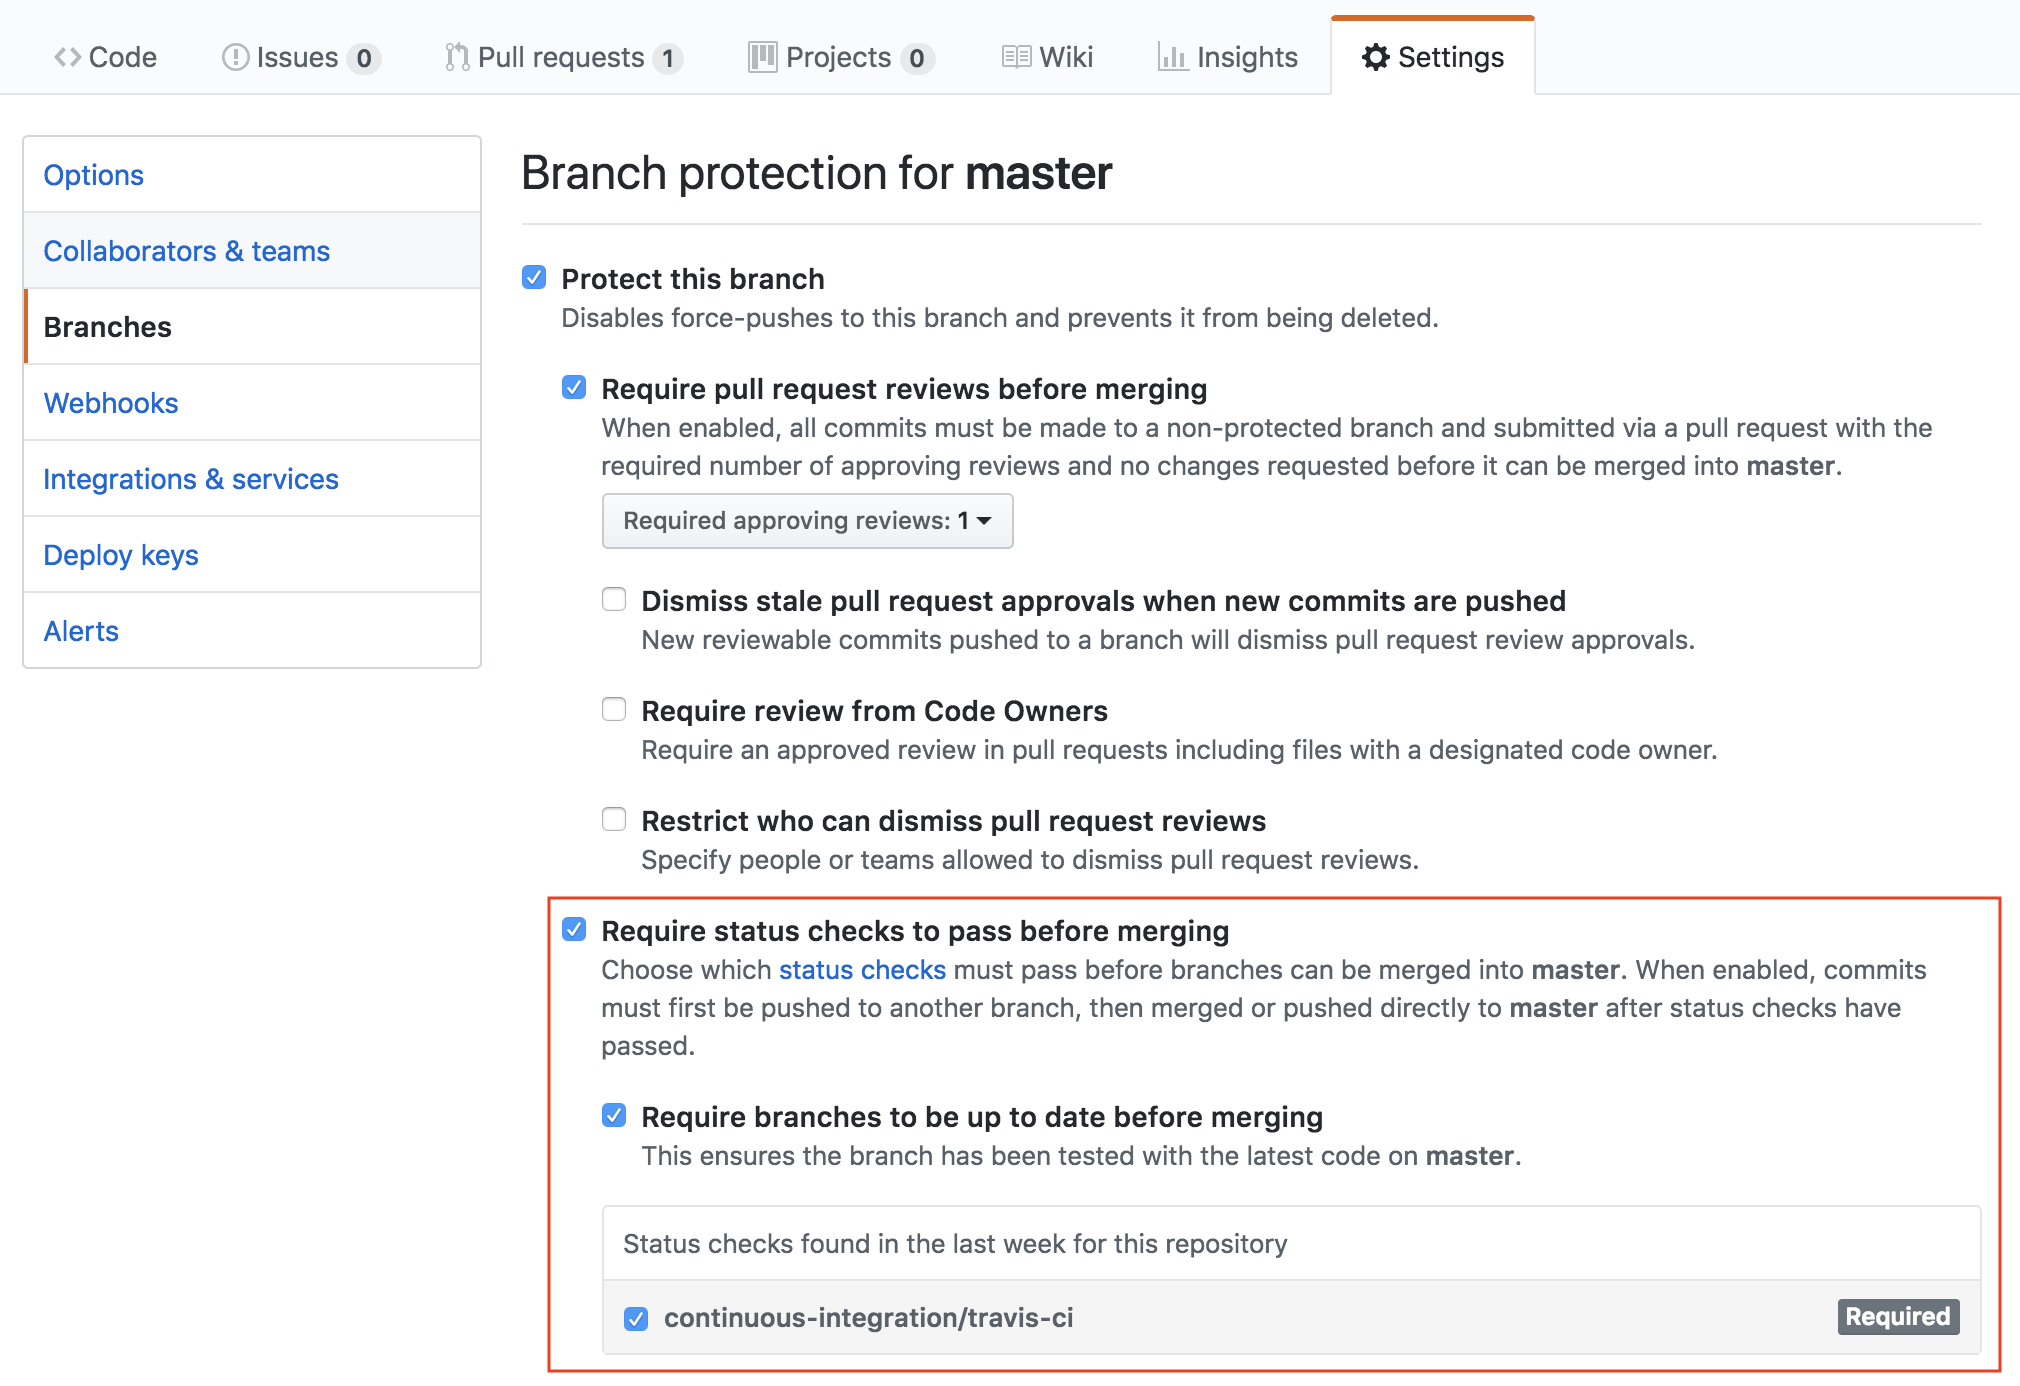
You can change some important settings for remote branches in ‘Branches’ tab of ‘Settings’. Here is an example configuration:
- Require pull request reviews before merging: If this setting is activated, code review via pull request becomes mandatory in order to merge your commits into the remote branch; it means you cannot push your commits directly.
- Include administrators: You need to activate this setting if you want to enforce all configured restrictions for administrators as well.
Test automation
Test automation is a critical part for Continuous integration; you can make your project more stable and efficient by automating all repetitive tests neccessarily conducted for every commit or pull request. Here, I use Travis CI which provides a variety of features for test automation, requiring just little effort. It works really well with GitHub.
Static analysis and Unittest automation via Travis CI
By the following steps, you can easily make tests run for every single change on your repository.
Step1. Sign up for Travis CI
Step2. Register your repository you would like to run automated tests
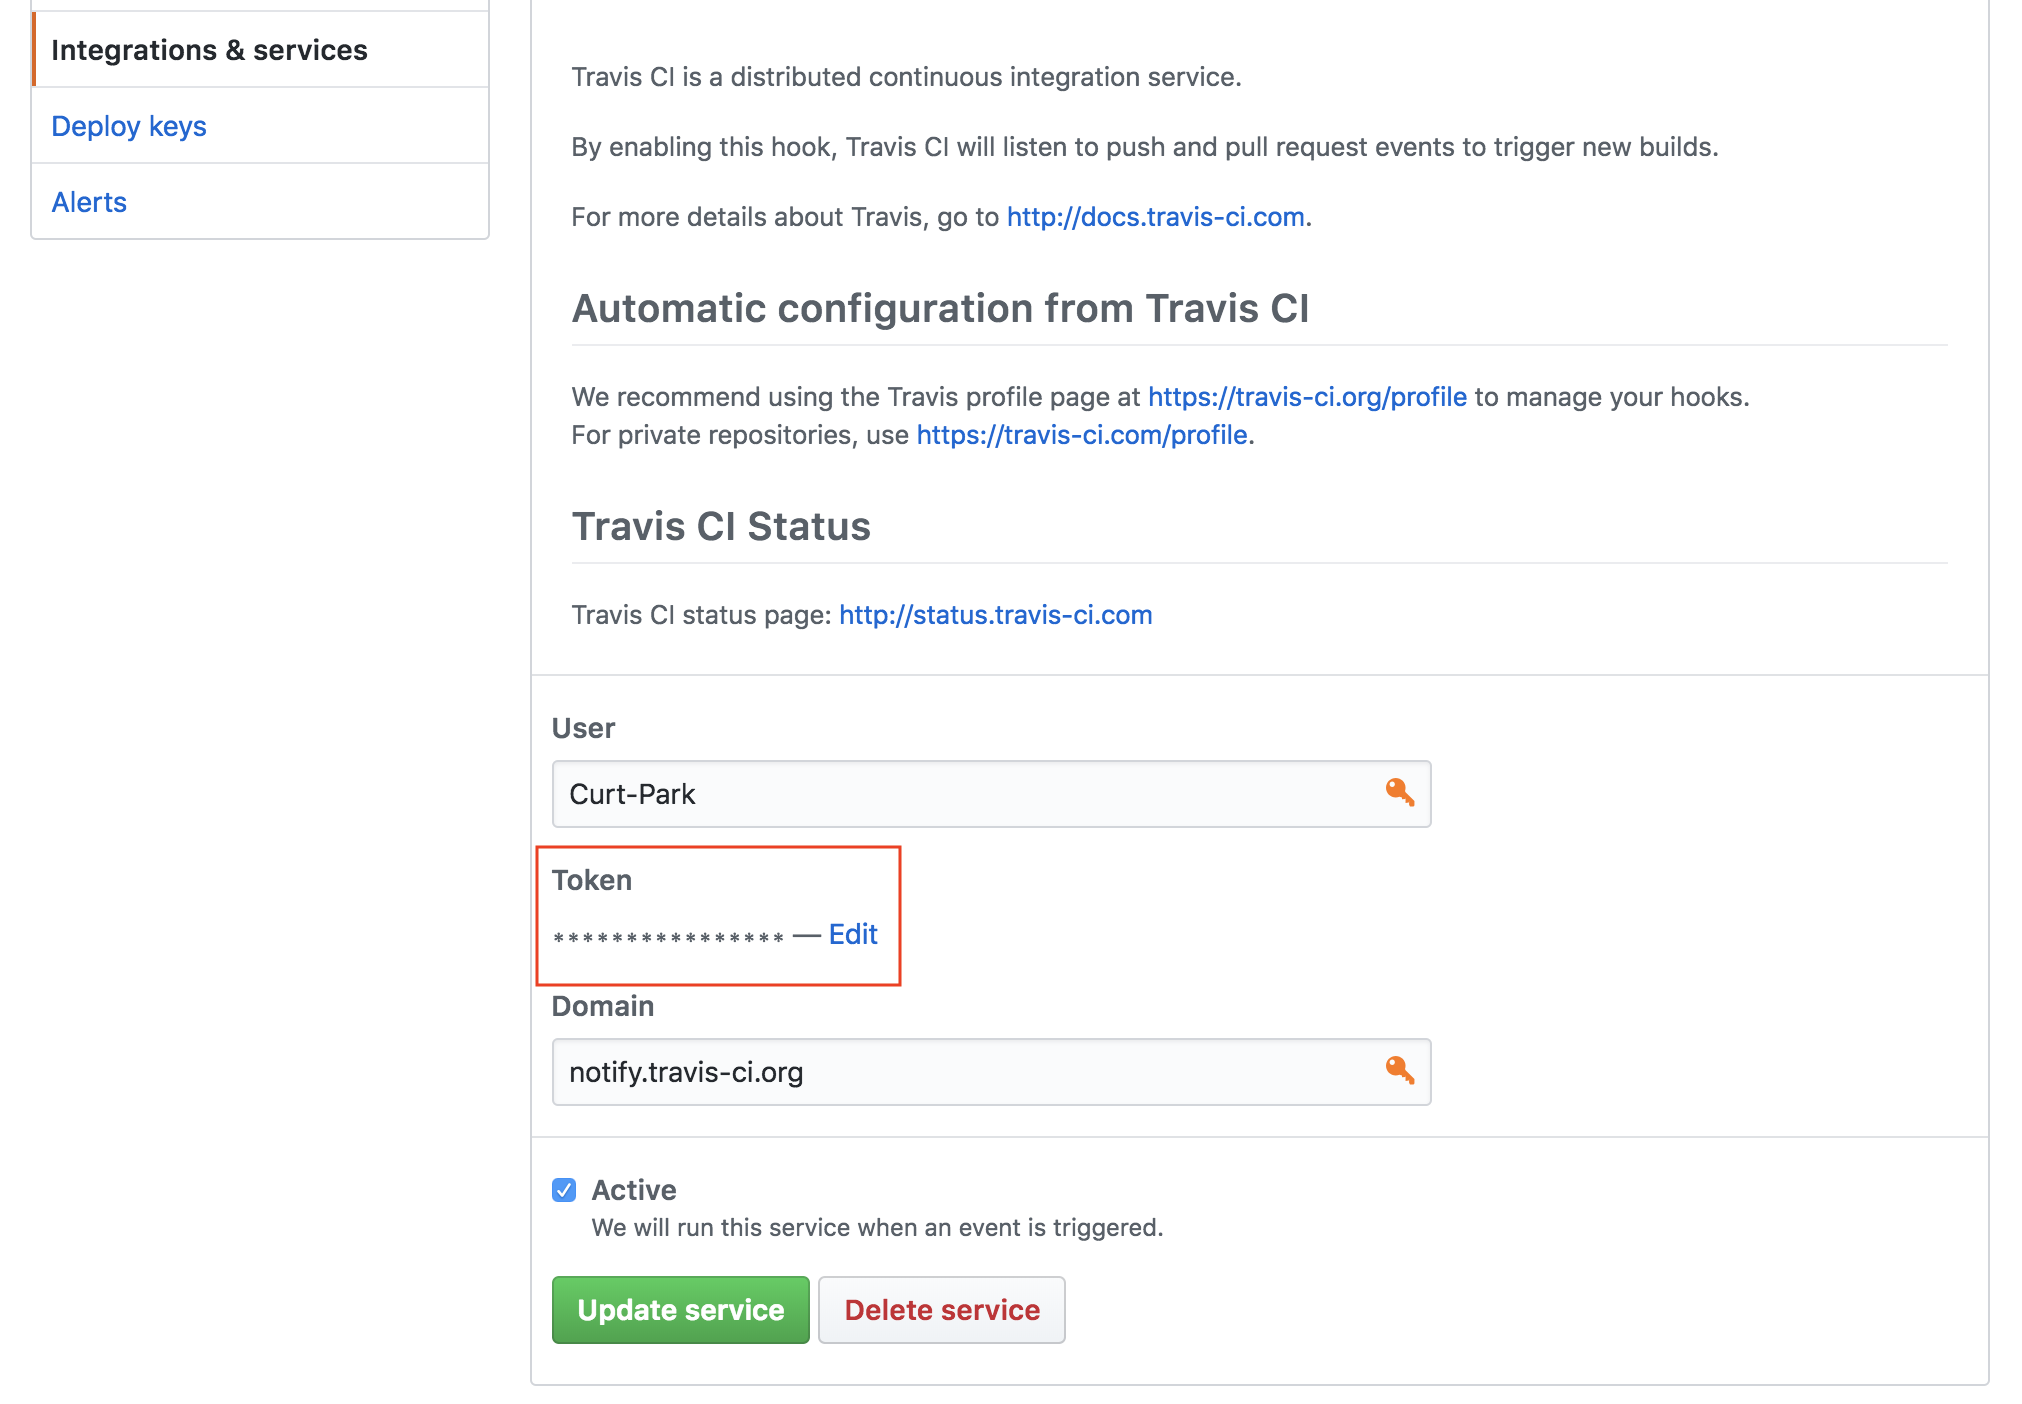
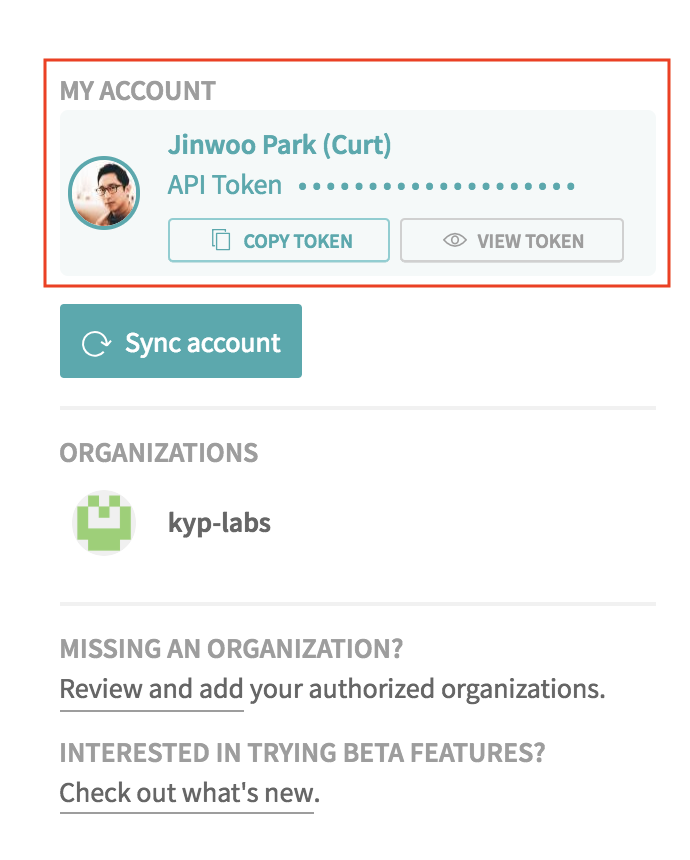
Step3. Register a token on your Github repository
The token can be obtained from your profile page in Travis CI.
Step4. Write .travis.yml on your repository and push the file. Here is an example:
language: python

python:
    - "3.6"

env:
    - pip install -r requirements.txt

sudo: false

install:
    # flake8: static analysis and style checks against PEP8
    - pip install -U flake8
    # pytest: unittest
    - pip install -U pytest

before_script:
    # Static analysis
    - flake8 .

script:
    # Unittest
    - pytest
There are plenty of choice[8] for Python static analysis tools. My team go for flake8 offering both static analysis and style checks against PEP8. Recently, flake8 is widely used for many open source projects because it is so fast and easy to use[9].
Note that You can see more examples from Travis CI user documentation[10]. As for pytest, see the official guide[11].
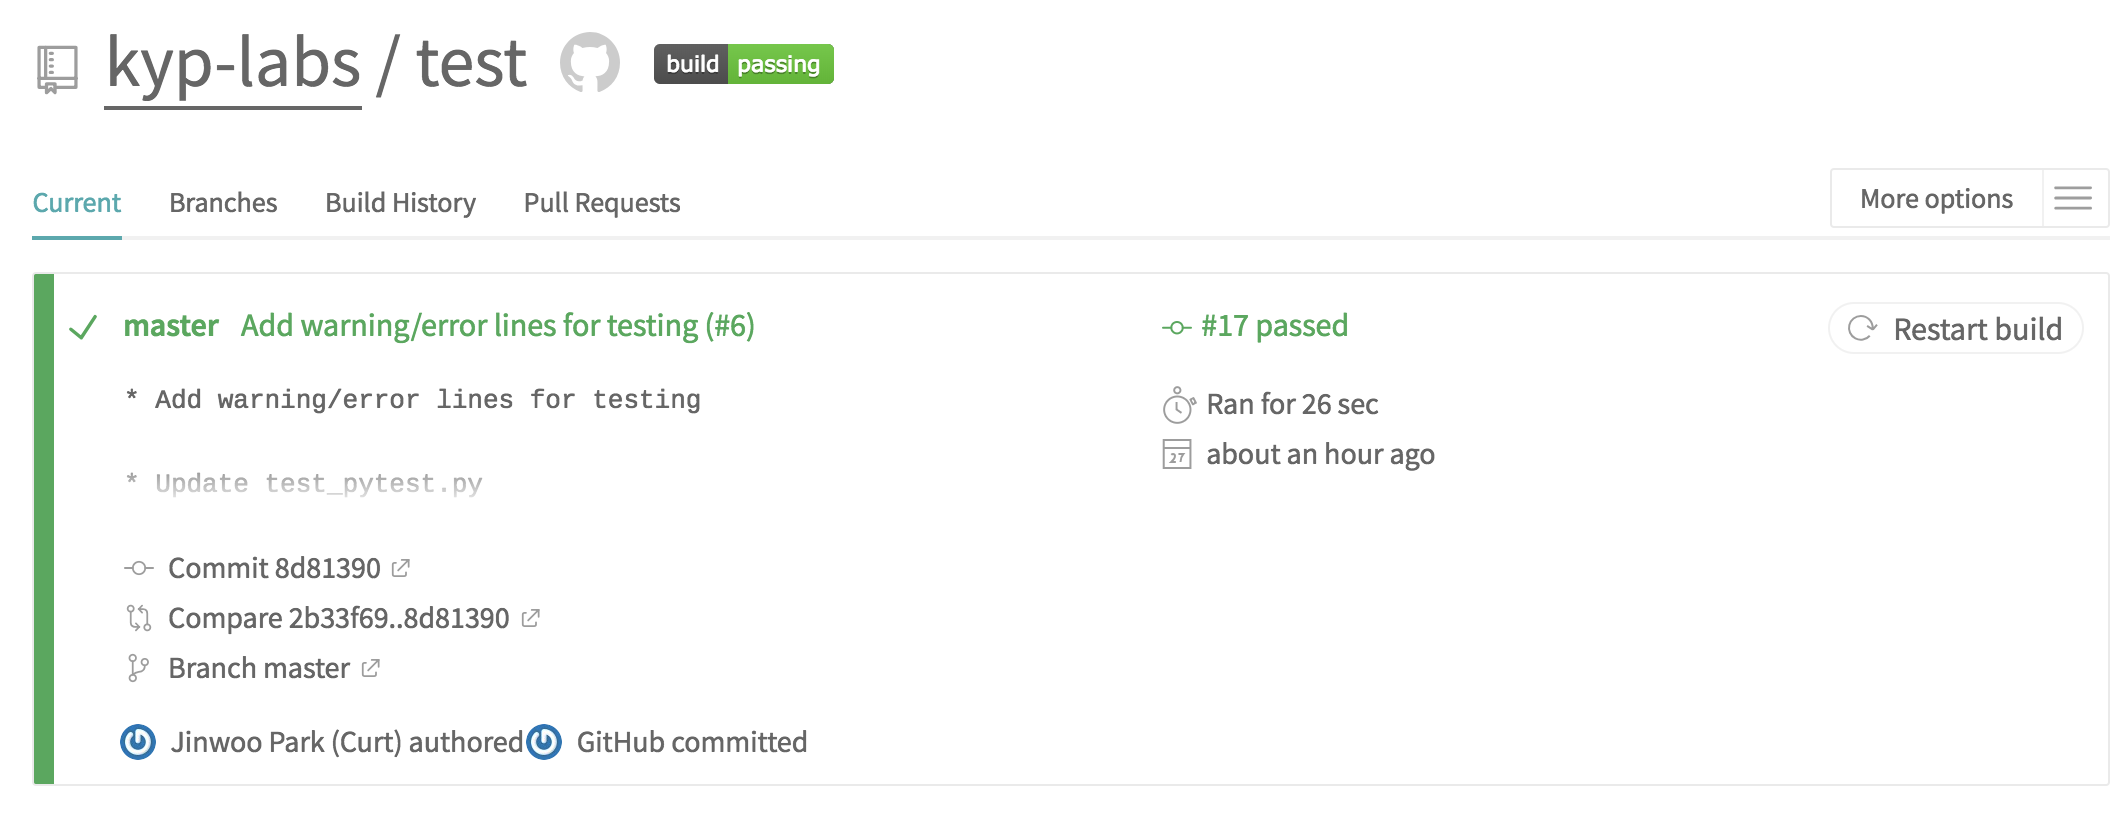
Step5. See if all tests run well.
Restriction on GitHub repository
You should add a restriction on GitHub to ensure every pull request fully verified before merged. Just activate the following checkboxes in the red box:
Useful keywords for further studies
- Code coverage check
- Code climate
References
- Chris, B. (2013). How to Write a Git Commit Message. [Online] Available at: https://chris.beams.io/posts/git-commit/ [Accessed 3 June 2018].
- Rachel, P. (2015). What’s with the 50/72 rule?. [Online] Available at: https://medium.com/@preslavrachev/what-s-with-the-50-72-rule-8a906f61f09c [Accessed 3 June 2018].
- GMTA. (2014). Why do a lot of developers apply a 72-character line limit to their commit messages? Why not let software handle wrapping?. Available at: https://www.reddit.com/r/git/comments/20ko8g/why_do_a_lot_of_developers_apply_a_72character/ [Accessed 3 June 2018].
- Thompson, C. (2013). 5 Useful Tips For A Better Commit Message. [Online] Available at: https://robots.thoughtbot.com/5-useful-tips-for-a-better-commit-message [Accessed 3 June 2018].
- Tournoij, M. (2017). Limit subject line of git commit message to 50 characters. [Online] Available at: https://stackoverflow.com/questions/43929991/limit-subject-line-of-git-commit-message-to-50-characters [Accessed 3 June 2018].
- Visual Studio Team Service. (2018). Adopt a Git branching strategy. [Online] Available at: https://docs.microsoft.com/en-us/vsts/git/concepts/git-branching-guidance [Accessed 3 June 2018].
- The GitHub Blog. (2016). Squash your commits. [Online] Available at: https://blog.github.com/2016-04-01-squash-your-commits/ [Accessed 3 June 2018].
- Codacy. (2016). Review of Python Static Analysis Tools. [Online] Available at: https://blog.codacy.com/review-of-python-static-analysis-tools-ff8e7e27f972 [Accessed 4 June 2018].
- mzfr98. (2018). Any advantages of Flake8 over PyLint?. [Online] Available at: https://www.reddit.com/r/Python/comments/82hgzm/any_advantages_of_flake8_over_pylint/ [Accessed 4 June 2018].
- Travis CI. (2018). Building a Python Project. [Online] Available at: https://docs.travis-ci.com/user/languages/python/ [Accessed 4 June 2018].
- pytest. (2018). Installation and Getting Started. [Online] Available at: https://docs.pytest.org/en/latest/getting-started.html [Accessed 4 June 2018].
